How to remove existing wireless network profile in Windows XP
Step 1
Open Control panel, select and double click Network Connections.
Step 2
Select Wireless Network Connection, right click it and select Properties.

Step 3
Choose “Wireless Networks” tab and select existing network in preferred networks, then click Remove.

Step 4
Click OK. and the network should be removed
Step 5 – Or how to add a Wireless network connection in windows XP
Then Select Wireless Network Connection, right click it, select and click View Available Wireless Networks.

Step 6
Click Refresh Network list to view available wireless networks. Select the correct network which you want to connect, double click it or click Connect button.

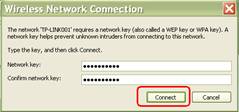
Step 7
If the wireless network is secured, it will pop up a window asking for the key/password.
Pay attention to the case of the characters, so if they are in CAPITALS then replicate the same in the password box. This is a common error and can drive people to despair as they beleive they have inserted the correct code. Remember passwords are usually case sensitive.

Step 8
Enter the correct Key then click Connect, wait for a while, you will connect to this wireless network.

NOTE:
- If it keeps connecting to the network or acquiring IP address, please check if you had entered the correct key/password.
- If it shows that the connection is Limited or no connectivity, please ensure that you had enabled DHCP server on the wireless router/access point.
- There maybe a button you need to press on the router to enable you to connect new devices to your network
- Shouting at it wont make it work any quicker, but may make you feel good.